# Unreal
Our Unreal Connector is in an beta stage of development. Currently we only support receiving objects, and there is no UI to fetch lists of streams/commits/branches.
We officially support Unreal Engine 4.26 and 4.27, and have experimental support for UE5.
Make sure to check out (and star ⭐️ ) our Github repository: https://github.com/specklesystems/speckle-unreal (opens new window) If you have any thoughts or suggestions about this plugin, you're welcome to discuss them in our forum (opens new window).
TIP
Check out our dedicated tutorials on Unreal (opens new window)!
# Installation
The Unreal connector is packaged as an Unreal Engine plugin that is currently only available through GitHub. To use it in your project:
Download
speckle-unrealrepository archive from https://github.com/specklesystems/speckle-unreal/archive/refs/heads/main.zip (opens new window)Extract the downloaded archive into your project's
Pluginsdirectory (if your project directory doesn't contain a directory calledPlugins, you should create it)
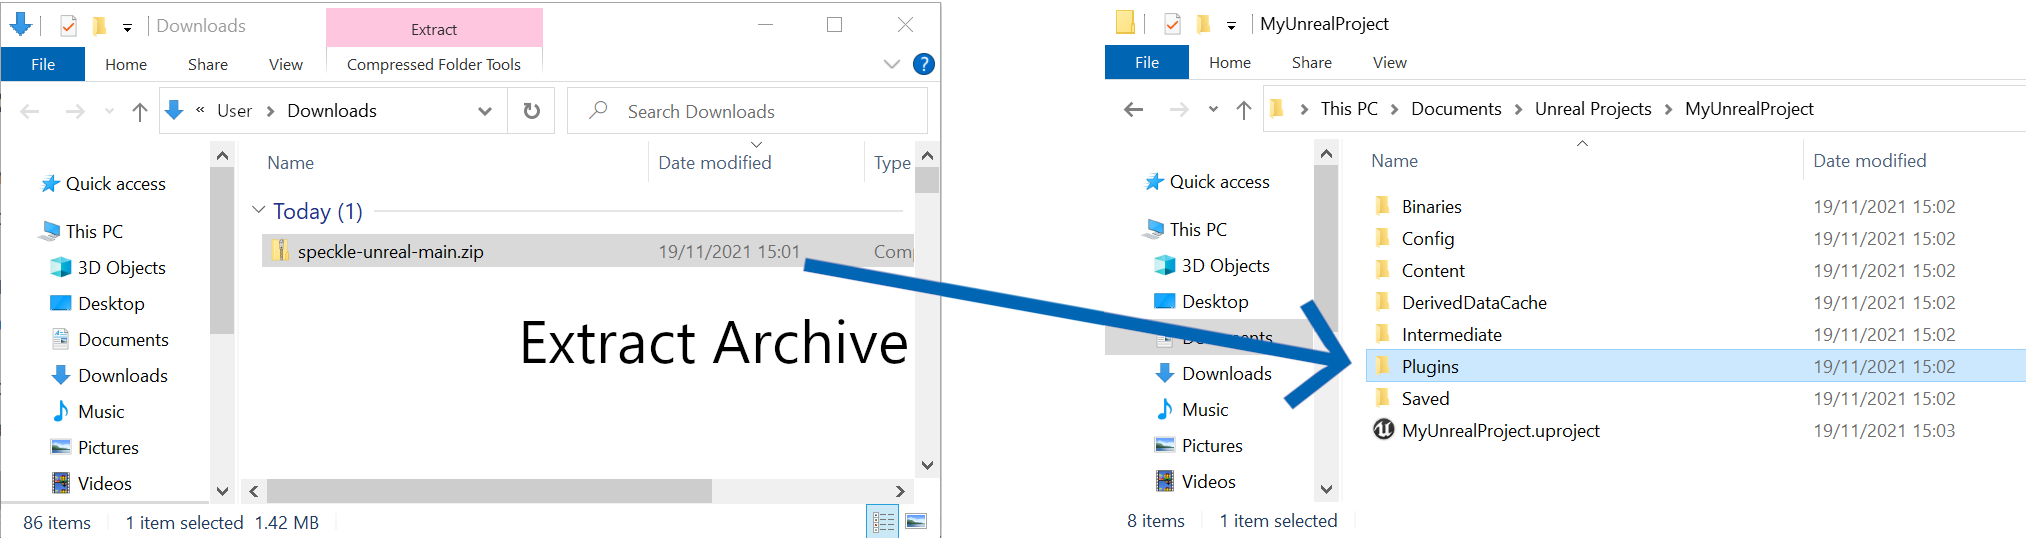
- Open your UE project (or restart the editor if you already have it opened). This will build the plugin in your environment.
That's It! Your project can now use the Speckle plugin!
For additional resources, see Unreal's guides on Installing Unreal Engine (opens new window), Setting Up Visual Studio for Unreal Engine (opens new window), and Create a New Project (opens new window).
# Alternate Installation (git)
If you plan on developing on top of speckle-unreal or prefer to use git, you can clone the git repository into your project's Plugins directory
Within your project's
Pluginsfolder executegit clone https://github.com/specklesystems/speckle-unreal.git1Open / Restart your Unreal project.
For a beginners guide to git, see git - the simple guide by Roger Dudler (opens new window).
# Usage (editor)
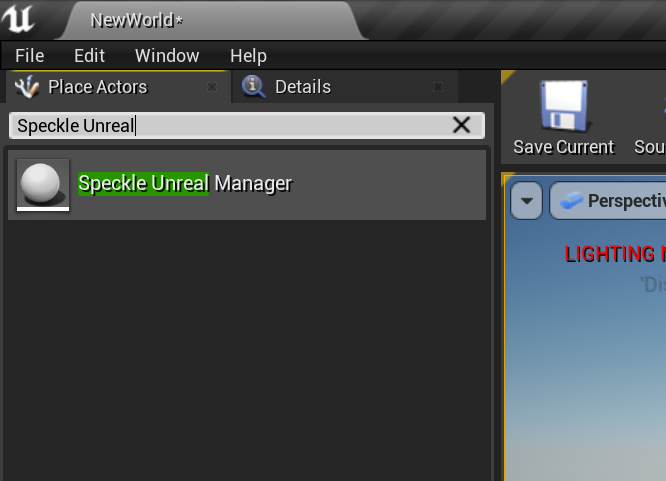
The plugin includes an actor type named Speckle Unreal Manager that you can use to import objects from Speckle.
Here is how to use it:
- In the
Place Actorssidebar, search for Speckle Unreal Manager and add it to the world.
- Select the
SpeckleUnrealManagerinstance in theWorld Outlinersidebar and use the options presented in theSpecklecategory.
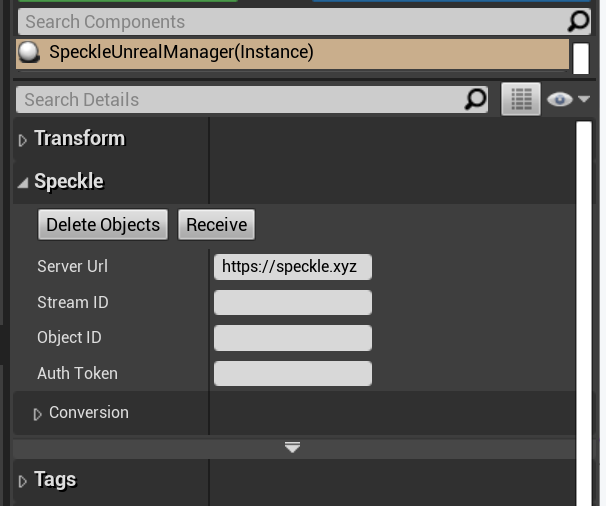
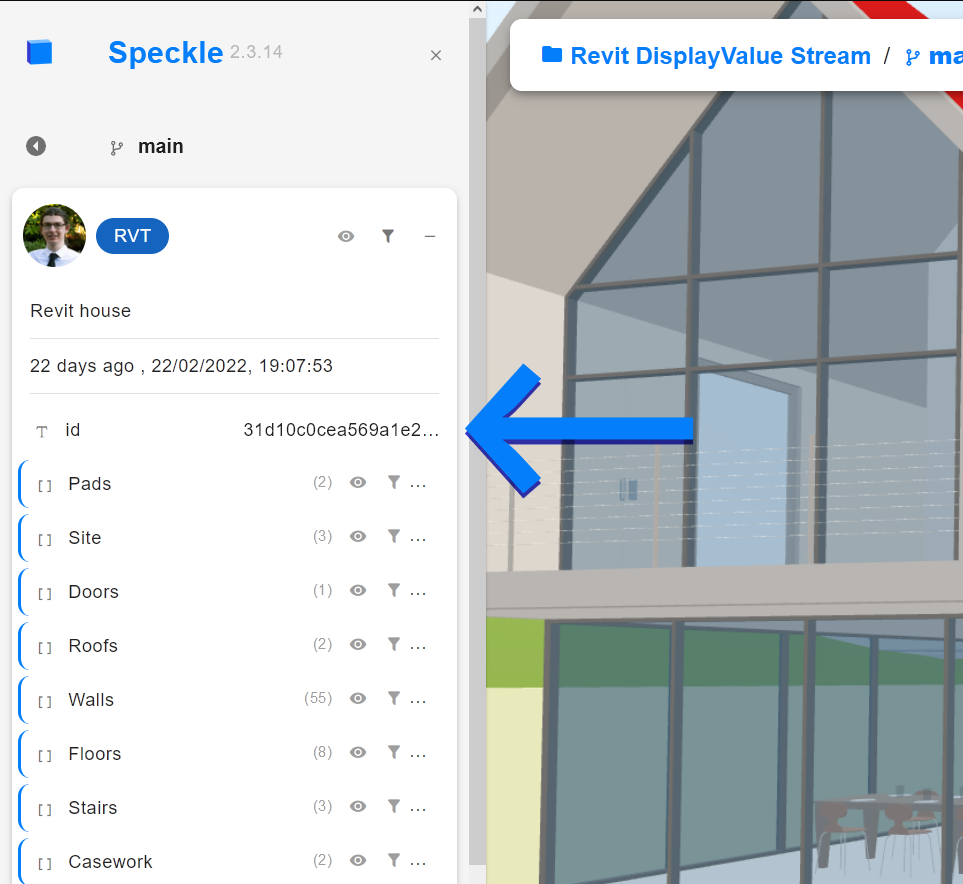
- Currently, we require an explicit ObjectID to import. You can explore the objects in a stream by using the Speckle Web App for the Speckle server that you use.
- If your Speckle Stream is not public, you must generate a Personal Access Token and set it in the
Auth Tokenconfiguration option.
IMPORTANT
⚠️ Treat your Personal Access Token as a password. If someone else has access to your auth token, they can access your Speckle data.
- After you set up the import parameters, just click the
Receivebutton. The specified object and all its children will be imported as Actors.
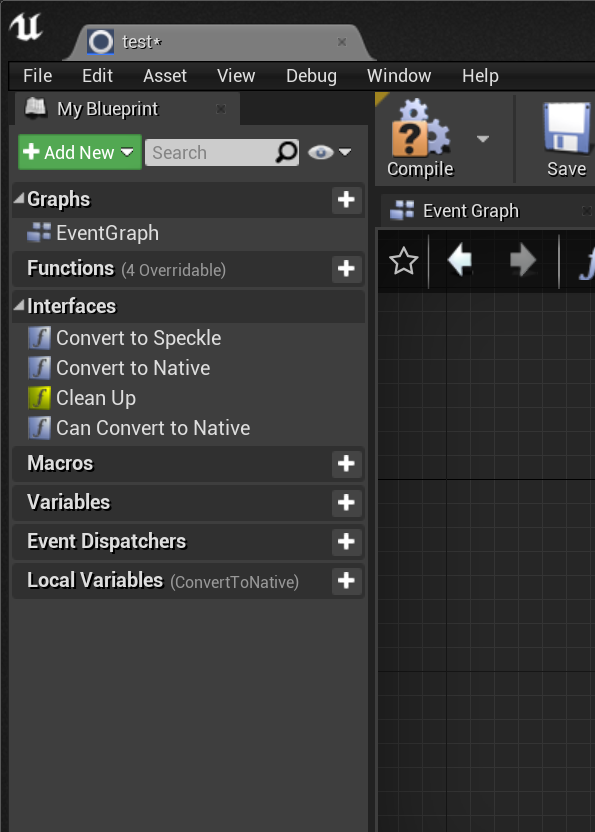
# Usage (blueprint)
The receiving process can be performed using blueprint, doing it this way can allow for extra flexibility for performing additional actions with received data/converted actors.
Using blueprint to do this requires some basic understanding of how the plugin works.
- A
ServerTransportis used to make a HTTP request to a Speckle server for the object (and its children). It fetches JSON objects from the server, which are then stored in a localMemory Transport. - The
ReceiveOperationnode handles the received objects, and deserializes them into Object Models (objects inheritingUBase). - The
SpeckleConverterComponentconverts these objects into native actors/components.
An example of this process in Blueprint is provided in the Plugins\speckle-unreal\Content\Examples directory and looks like this:
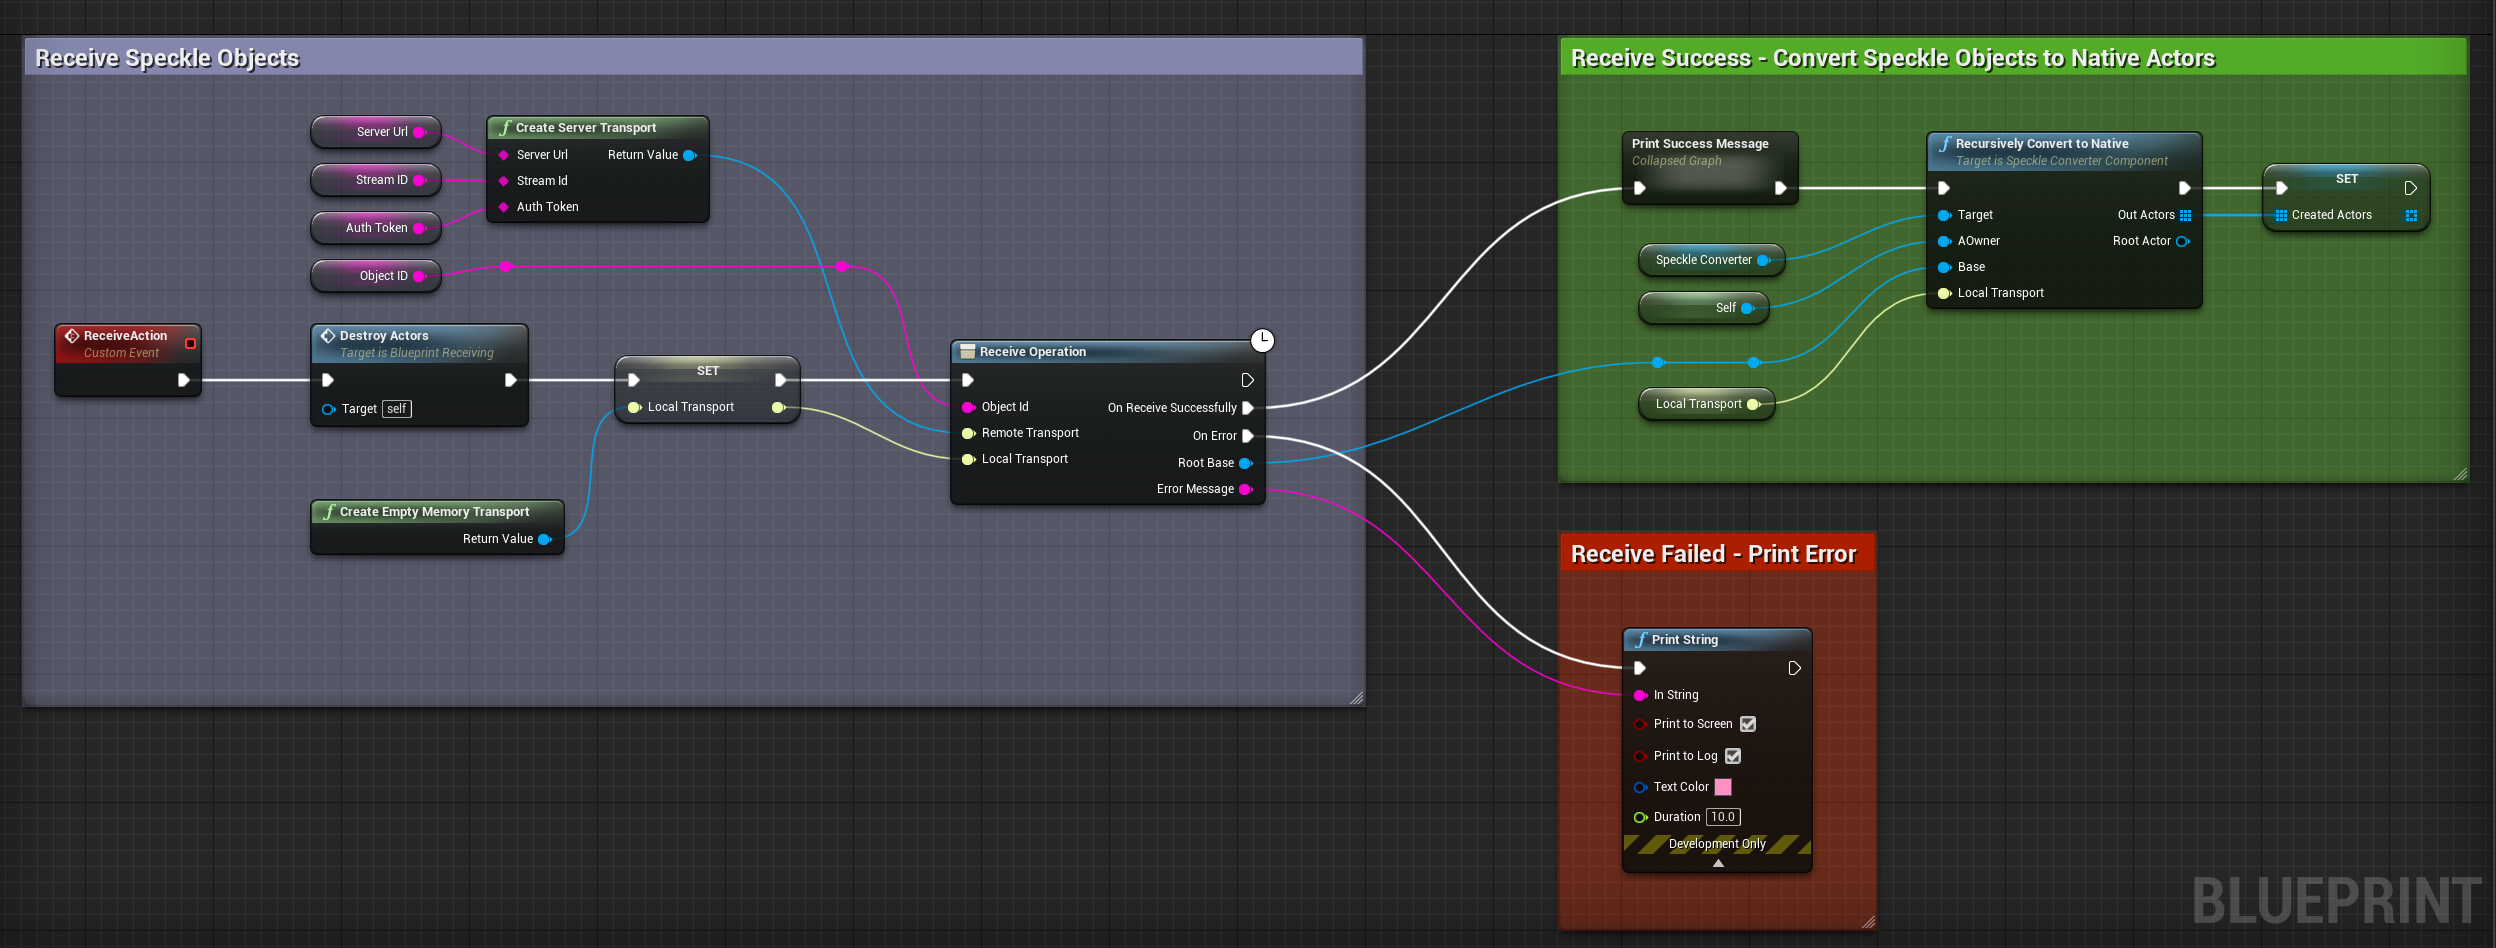
Blueprint can be a powerful tool for implementing your own custom behaviours for receiving objects.
# Object Conversion
The SpeckleConverterComponent provides the conversion functionality for converting Speckle objects to native UE Actors.
However, this class does not contain specific conversion logic.
Instead, the converter logic is modularised, such that the conversion functions and settings for specific types are encapsulated in their own class implementing ISpeckleConverter.
Please note that
ISpeckleConverterhere, is not the same as theSpeckle.Core.Kits.ISpeckleConverterin the .NET SDK.
Out of the box, the plugin provides converters for the following conversions:
StaticMeshConverterandProceduralMeshConverterare mutually exclusive, and for most users we recommend using static meshes (default).
Due to the nature of Unreal Engine, it is necessary to offer options/settings for how objects are converted.
So each ISpeckleConverter can also expose properties that can be set from within the editor, or from BP/C++.
This structure is distinctly different from other connectors, which often have one large conversion class that holds many conversions, and provide few (if any) settings.
Using the StaticMeshConverter as an example, you can see that it exposes several settings, such as the type of actor to create, and mesh build settings.
Out of the box, SpeckleConverterComponents will be setup with a set of default converters.
For most users, there is no further configuration required.
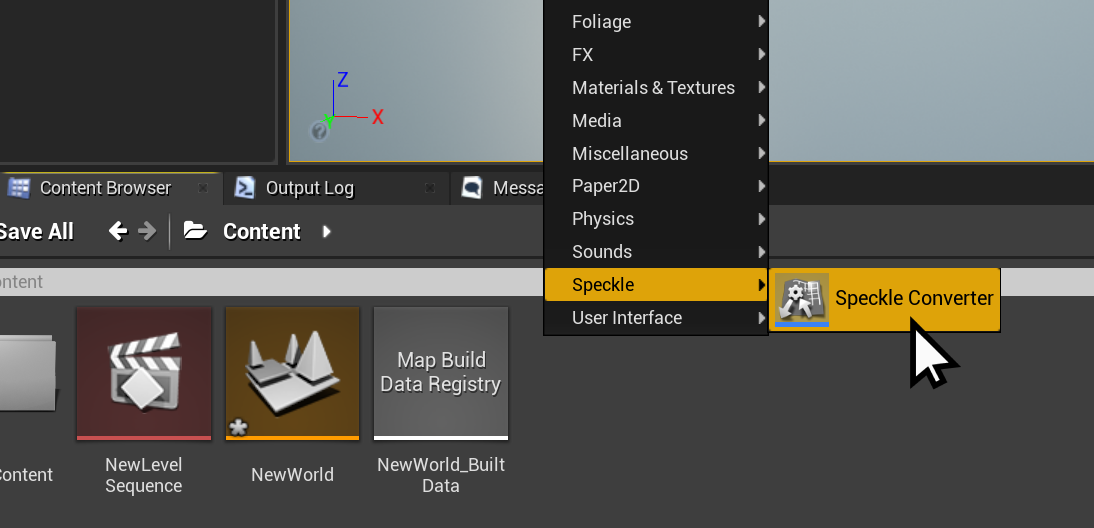
However you can create your own instances of specific ISpeckleConverters through the assets in the Content, and then assign them to the Converter Component.
This can be done by right clicking and creating a new converter of a specificed type.
You can create your own custom converters in BP/C++ (see Creating Custom Conversion docs)
# Mesh Converters
Speckle-Unreal provides two types of mesh converters:
ProceduralMeshConverter(opens new window):- Creates a
UProceduralMeshComponent. - Slightly faster to convert, and allow run-time editing of vertices/faces.
- Slowest to render, can't use baked lighting.
- Creates a
StaticMeshConverter(opens new window):- Creates a
UStaticMeshComponent. - Mesh vertices/faces/etc can't be edited easily (needs to be rebuilt).
- Faster to render.
- Built meshes can be saved as assets allowing levels to be reloaded.
- Additional Editor only build process allows for baked lighting, extra path-tracing options, and more optimised rendering.
- Creates a
For most users we recommend using Static Meshes because they are more optimised for rendering and can be saved to a level. Static Meshes can be used during runtime or editor mode, but editor only build process will only be available with editor access.
There currently is a bug in Unreal Engine 5 Preview 2 that may cause runtime-built static meshes to have broken lighting (opens new window).
# Material Converter
As a tool, Unreal shines when it comes to producing beautiful, photorealistic renders of scenes. This has significant value for Speckle users as a tool for producing high quality and real-time demonstrations, animations, and XR experiences.
For some users, the simple flat shaded PBR materials converted using an object's RenderMaterial (opens new window) will be all they want.
Many users, however, want to use textured materials, after all, Unreal excels in photorealism, and high quality materials are a significant part of that.
The Material Overrides feature of the MaterialConverter addresses this need, as it enables a semi-automated workflow for applying textured materials to received geometry.
Speckle's Objects (opens new window) kit supports PBR materials through
the RenderMaterial (opens new window) property of Speckle meshes.
When receiving meshes with a RenderMaterial, the MaterialConverter will create a MaterialInstance (opens new window)s which are applied to converted meshes.
TIP
Unreal has integration with Quixel (opens new window), a library of high-quality materials and assets that are free to use inside of Unreal Engine.
# How are materials converted
The MaterialConverter exposes a few properties for defining the base/parent material of the materials created.
Opaque materials will be converted as instances of BaseMeshOpaqueMaterial.
And transparent materials will be converted as instances of BaseMeshTransparentMaterial.
By default, these base materials are simple materials with opaque/translucent shader models respectively.
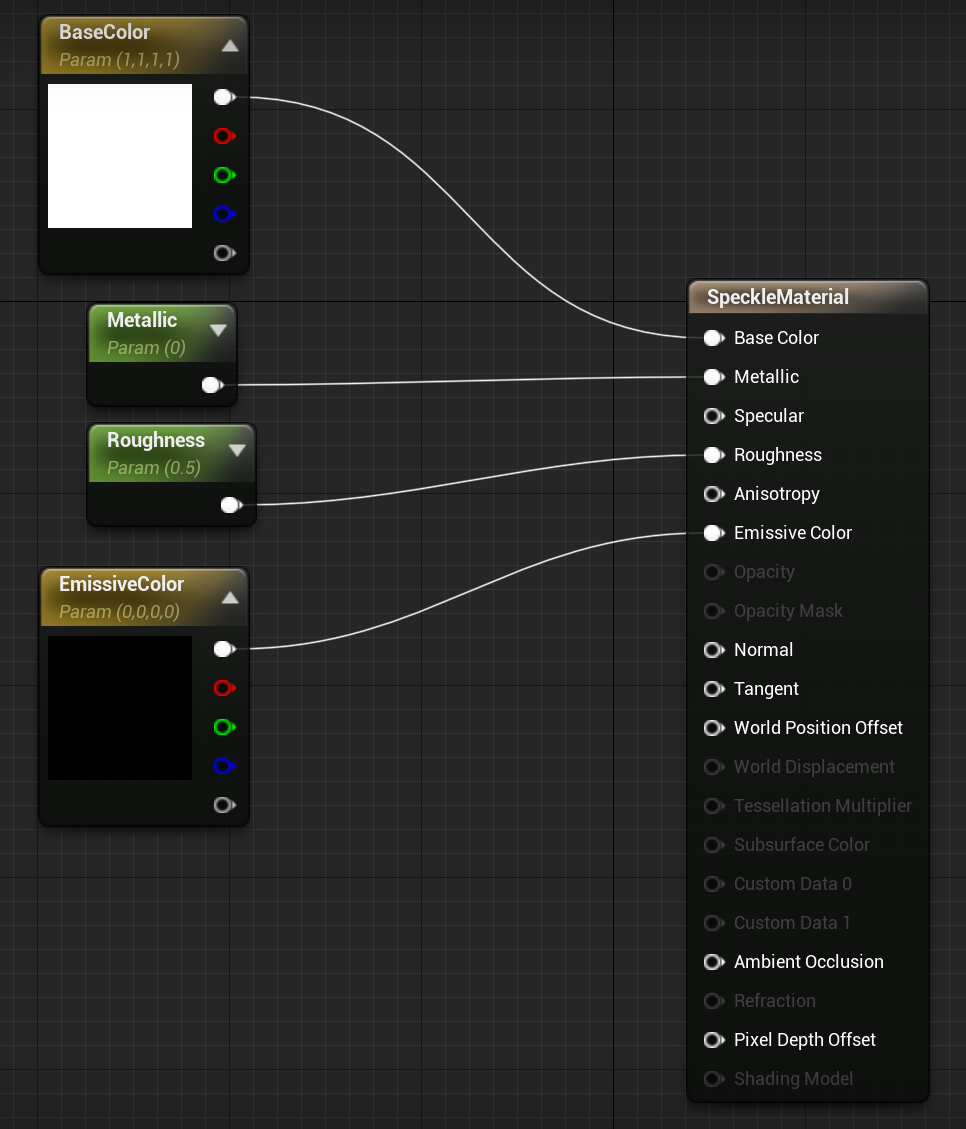
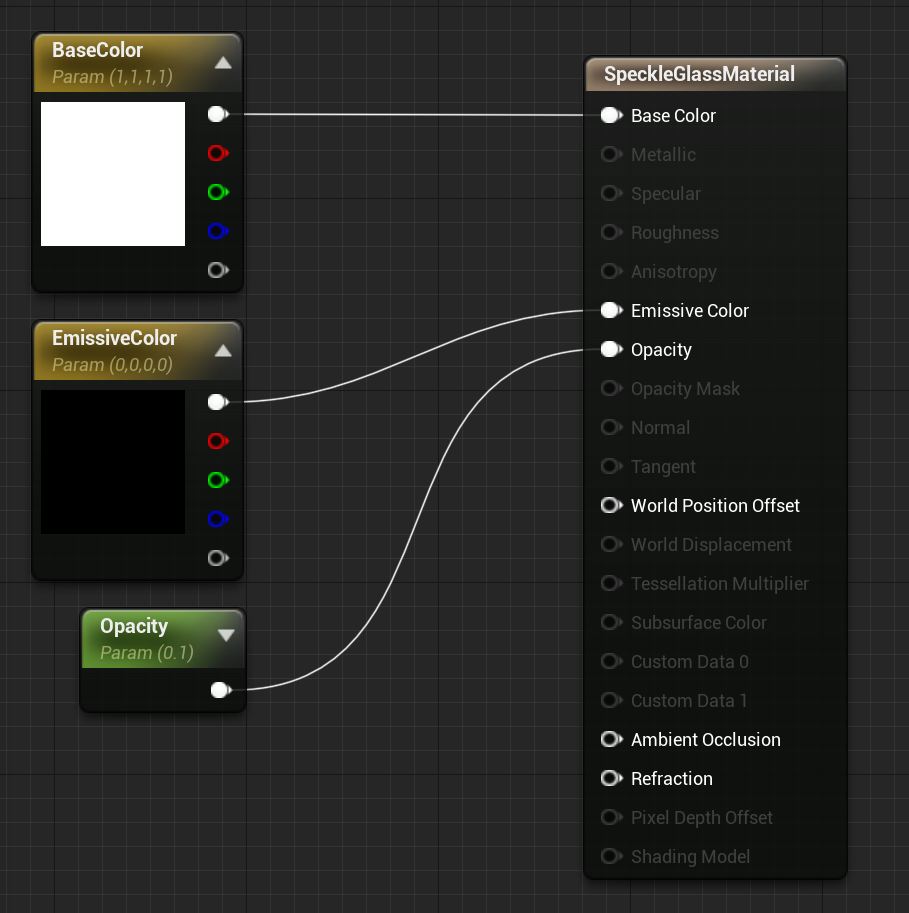
Both have several properties exposed (see screenshot), and during the conversion process,
these properties are set with the values from the RenderMaterial.
The default opaque material "SpeckleMaterial", looks like this:
And the default translucent material "SpeckleGlassMaterial", looks like this:
These base materials are exposed as properties of the converter, and can be changed from within the editor (or from BP/C++) to a custom material.
# Overriding Converted Materials
Speckle does not currently support sending/receiving textured materials. However, we do provide a way to automatically apply native Unreal materials while receiving objects from Speckle.
Converted materials can be overridden with custom materials in two ways.
- By Name - The
RenderMaterial.namewill be matched against materials in theMaterialsOverridesByNamearray. - By Id - The
RenderMaterial.idwill be by key with materials in theMaterailOverridesByIdmap.
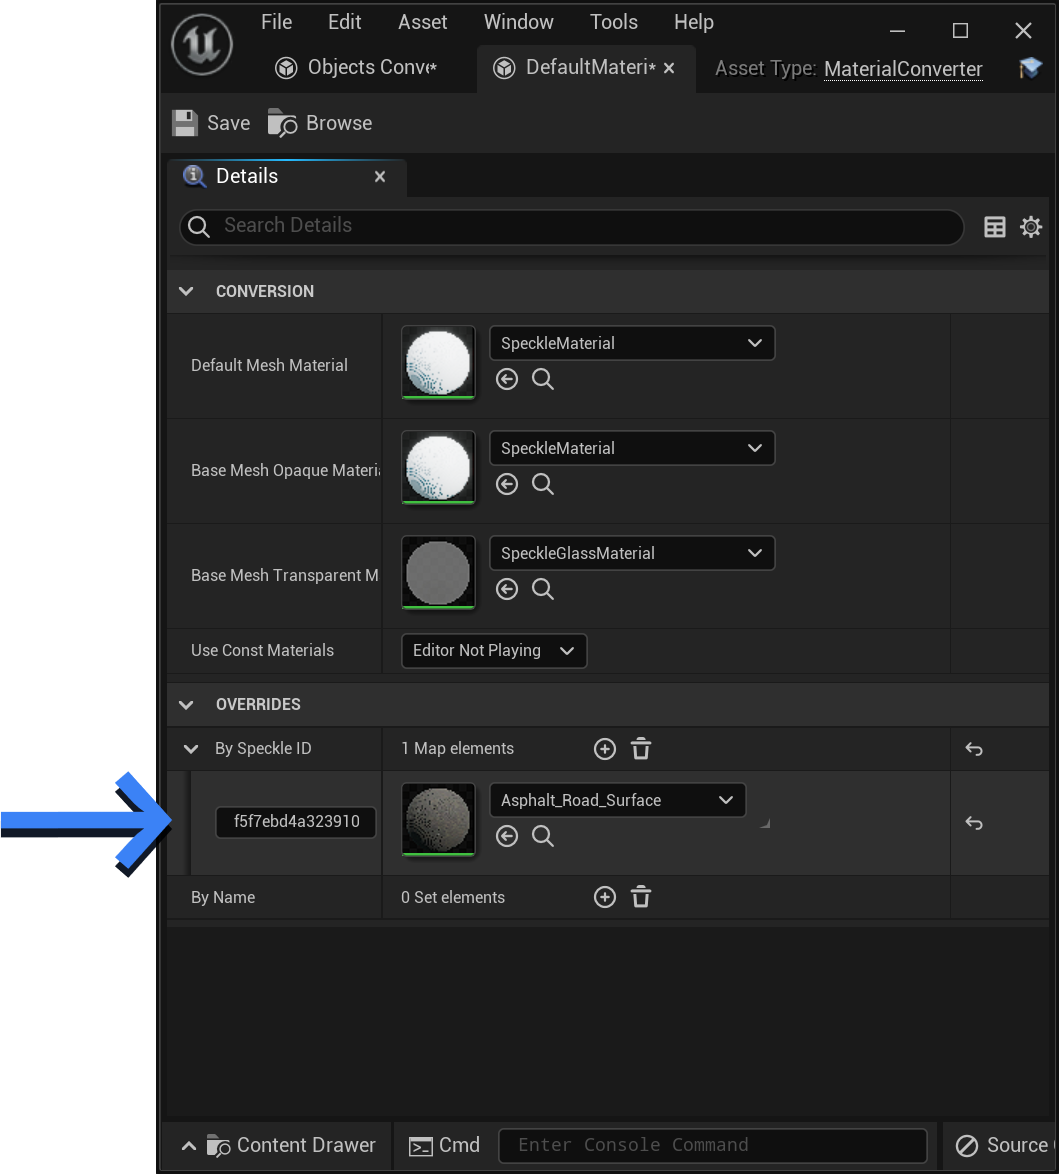
Screenshot of material overrides By ID in the details panel of the default MaterialConverter instance.
Materials with the ID f5f7ebd4a... will use this material instead of converting one from the object's RenderMaterial.
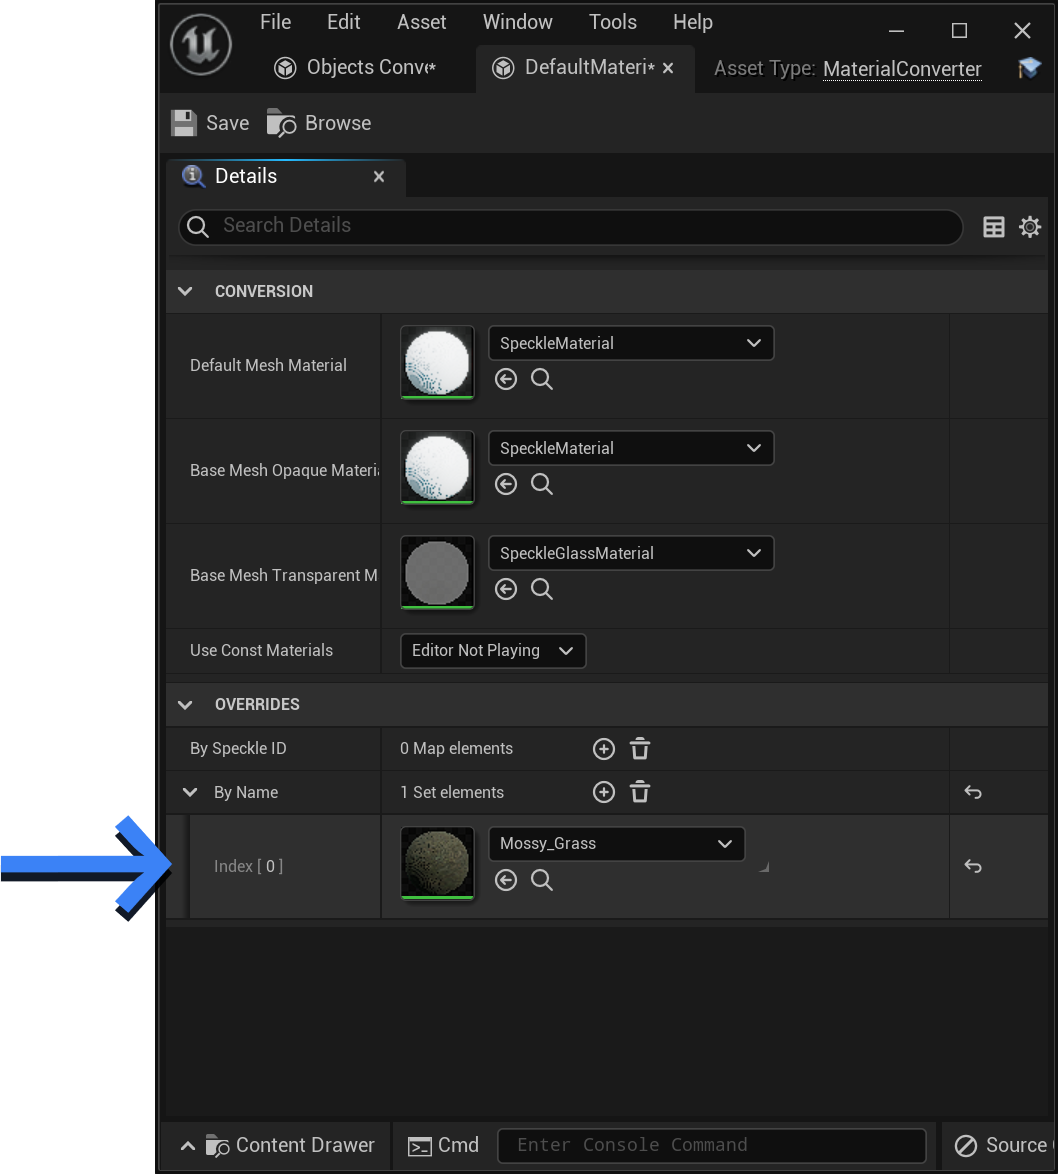
Screenshot of material overrides By Name in the details panel of the default MaterialConverter instance..
Materials with the name Mossy_Grass will use this material instead of converting one from the object's RenderMaterial.
# Material Priorities
Material priority (high to low).
- A material in
OverridesByIdthat matches by Id. - A material in
OverridesByNamethat matches by Name. - A material cached from a previous receive operation.
- A material asset in the
/Game/Speckle/Materials/{id}package. (i.e. from a previous receive, but not cached, or from a strategically placed asset) - A material converted from
RenderMaterialof the Mesh. - Finally, if all else fails, the
DefaultMaterialset in theMaterialConverterwill be used.
Note: If there is no material on an object, we do not fall back to the parent's material like previous versions of this connector. We are aware this may cause unexpected behaviour. This issue will be addressed.
# Limitations
- I order to use textured materials, meshes need to have Texture coordinates (UV coordinates). Currently, Texture coordinates are only outputted from Rhino, Blender, and Sketchup connectors. (More connectors will receive support shortly! see issue (opens new window). The Unreal connector does not generate texture coordinates for you. Having UV coordinates also has other advantages for baked lighting.
- Textures cannot be sent/received through Speckle, only flat colours and simple PBR properties. Fully supporting textures could add significant value for interoperability between Unreal, Unity, Blender, Rhino, and Sketchup, however poses several technical challenges.
# Developing Custom Conversion
As previously mentioned, ISpeckleConverter classes can expose properties, such as the type of Actor to create, whether to create an asset, or build settings etc.
If this doesn't satisfy your needs, there are a few ways to further customise conversion.
- You can extend an existing converter, and re-implement specific functions.
- You can write a completely custom
ISpeckleConverterclass and add an instance to yourSpeckleConverterComponent - You can extend the
SpeckleConverterComponentto customise more generally how objects are converted and actors attached.
Converters can be created in either C++ or Blueprint.
# Custom Object Models
Object Models in the Unreal plugin function the same as the Object Models in .NET.
Out of the box, the Speckle for Unreal plugin provides several Object Models.
These classes can be found in speckle-unreal\Source\SpeckleUnreal\Public\Objects and are all subclasses of the UBase type.
For the most part, these classes are direct ports of the corresponding .NET classes from our Objects kit.
For example Mesh, and BlockInstance.
An Object Model is required in order to convert Speckle objects. If you are looking to convert a type that we don't provide an Object Model, creating one is simple.
This process is very similar to defining an object model in the .NET and PY SDKs, But be aware of certain limitations:
- The UE plugin does not provide a reflection based (de)serializer. Object Models implement their own (de)serialization logic in the form of manually parsing JSON properties.
- Only certain Object Models are provided out of the box, while most are direct ports of Objects kit, some are not!
- The Speckle Type is defined in the Object Model's constructor, not by it's Namespace like in .NET.
- Units are applied while parsing (rather than ToNative conversion - subject to change)
To implement your own Unreal Object Model, simply create a new class inheriting from UBase.
Add your properties, and implement the Parse method to set these properties from the JSON object.
bool UMyObjectModel::Parse(const TSharedPtr<FJsonObject> Obj, const TScriptInterface<ITransport> ReadTransport)
{
	if(!Super::Parse(Obj, ReadTransport)) return false;

	// Add your own JSON parsing here!
	// Remove explicit properties from DynamicProperties array

	// Simple example of parsing an optional number property:
	if(Obj->TryGetNumberField("myProperty", MyProperty)) DynamicProperties.Remove("myProperty");

	// Simple example of parsing an required number property:
	if(!Obj->TryGetNumberField("myProperty", MyProperty)) return false; // Return false on error, rather than fatal assertions
	DynamicProperties.Remove("myProperty");

	//Return true if parsed successfully
	return true;
}
2
3
4
5
6
7
8
9
10
11
12
13
14
15
16
17
For further reference, see URenderMaterial for an example, see UMesh for a more advanced example.
UConversionUtils provides helper methods for dechunking / dereferencing Speckle objects.
Currently, Unit scaling is applied during Parsing (not conversion). This is subject to change!
In the future, we may consider creating a proper deserializer that uses reflection, this would mean Object Models can be deserialized without developers having to write these Parse methods.
There are several technical challenges for us to solve before this is possible.
Feel free to open a discussion on our forums (opens new window).
# Creating Converters (C++)
A custom converters can be defined by creating a UObject class that implements ISpeckleConverter.
You must implement the ConvertToNative and CanConverToNative methods.
UCLASS(BlueprintType, Blueprintable)
class SPECKLEUNREAL_API UMyConverter : public UObject, public ISpeckleConverter
{
	GENERATED_BODY()

public:
	virtual UObject* ConvertToNative_Implementation(const UBase* SpeckleBase, UWorld*, TScriptInterface<ISpeckleConverter>&) override;

	virtual bool CanConvertToNative_Implementation(TSubclassOf<UBase> BaseType) override;

}
2
3
4
5
6
7
8
9
10
11
12
Most likely, instead of jamming the actual conversion code in the ConvertToNative function, it is best to contain that in a separate function.
But this class can be implemented however you want!
The AvailableConverters parameter object is a reference to the master aggregate converter, and we can use this if we need to convert other Speckle Objects, and want to reuse conversion logic from another converter.
The StaticMeshConverter for example, will use the AvailableConverters to convert a RenderMaterial.
UObject* UMyConverter::ConvertToNative_Implementation(const UBase* SpeckleBase, UWorld* World, TScriptInterface<ISpeckleConverter>& AvailableConverters)
{
	const UMyObjectModel* m = Cast<UMyObjectModel>(SpeckleBase);

	if(m == nullptr) return nullptr;

	return MyObjectToNative(m);
}

AActor* UMyConverter::MyObjectToNative(const UMyObjectModel* MyObject, UWorld* World)
{
	// Conversion logic here!!
	// Convert MyObject into an Actor that we return
}
2
3
4
5
6
7
8
9
10
11
12
13
14
An optional CleanUp method can be implemented, which is used to clear any cached objects / any additional clean up that needs to be done between receive operations.
# Creating Converters (Blueprint)
In the same way as with C++, Converters can also be implemented using Blueprint.
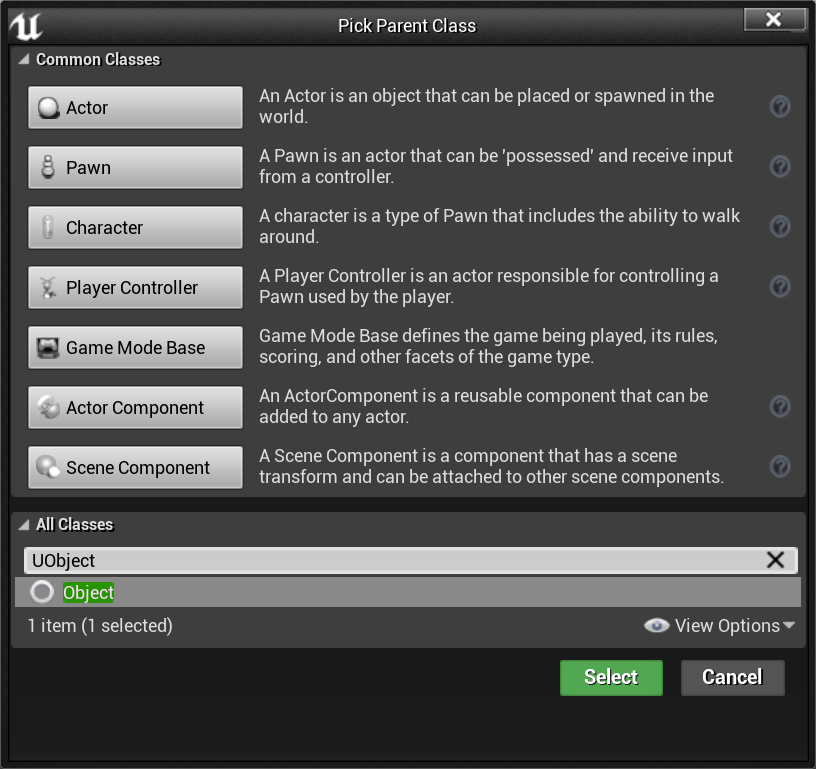
First create a new Blueprint Inheriting UObject
Under Class Settings add ISpeckleConverter to the Implemented Interfaces list.
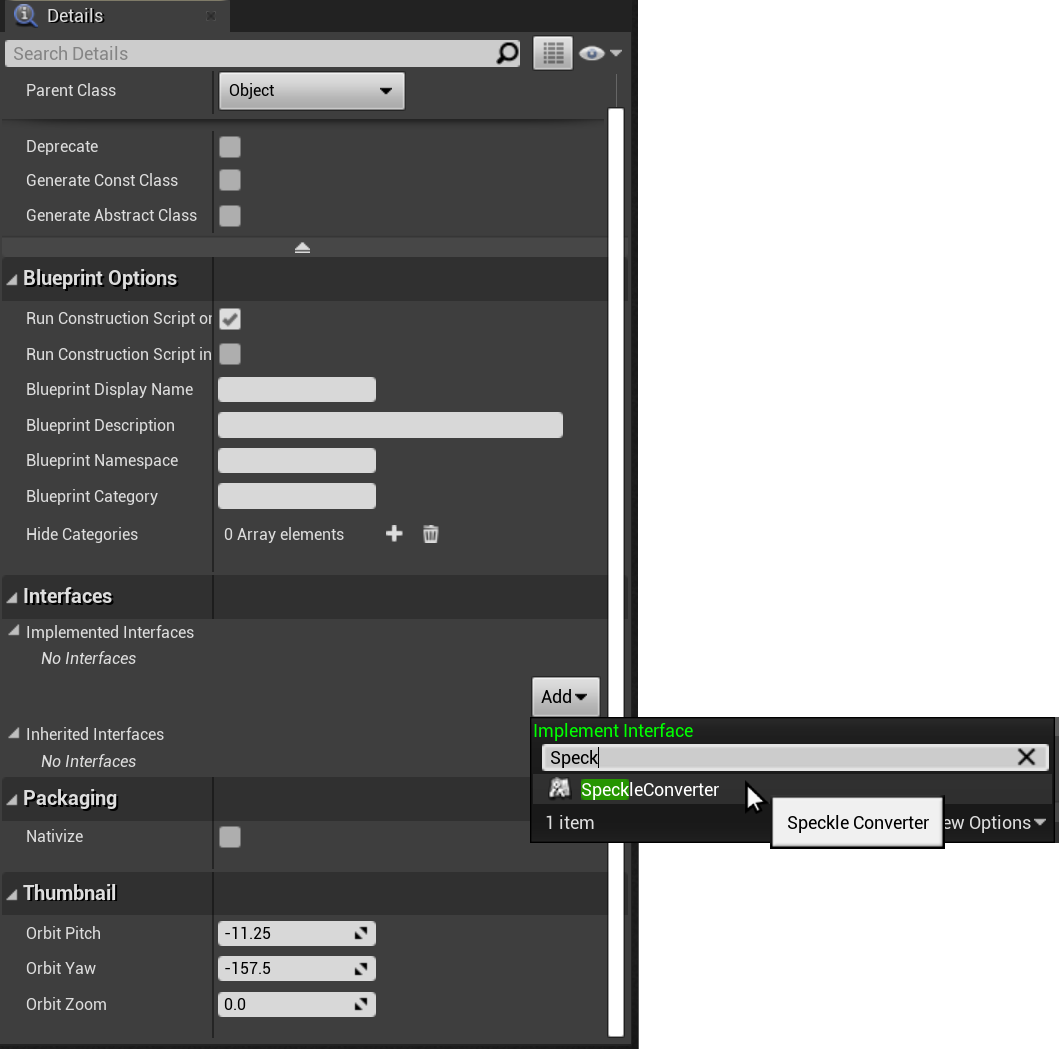
Finally, implement your conversion logic in the required functions.